Thursday, November 15, 2012

Dark Chocolate-Caramel Turtle Cake


There was two things I wanted to do yesterday - go to the gym and make a chocolate-caramel layered cake.   Usually those two things are never together on someone's agenda, they are pretty much the polar opposite of activities.  Most people avoid cake and go to the gym.  Or they avoid the gym and eat lots of cake.  I am not sure which type of person I am anymore.  I wisely decided to make the chocolate cake first, became really hungry, and ended up having chocolate cake for dinner.  D'oh!  After I inhaled a piece I realized at that point there was no way I was going to go the gym anymore. Oh well, there is always tomorrow... right?

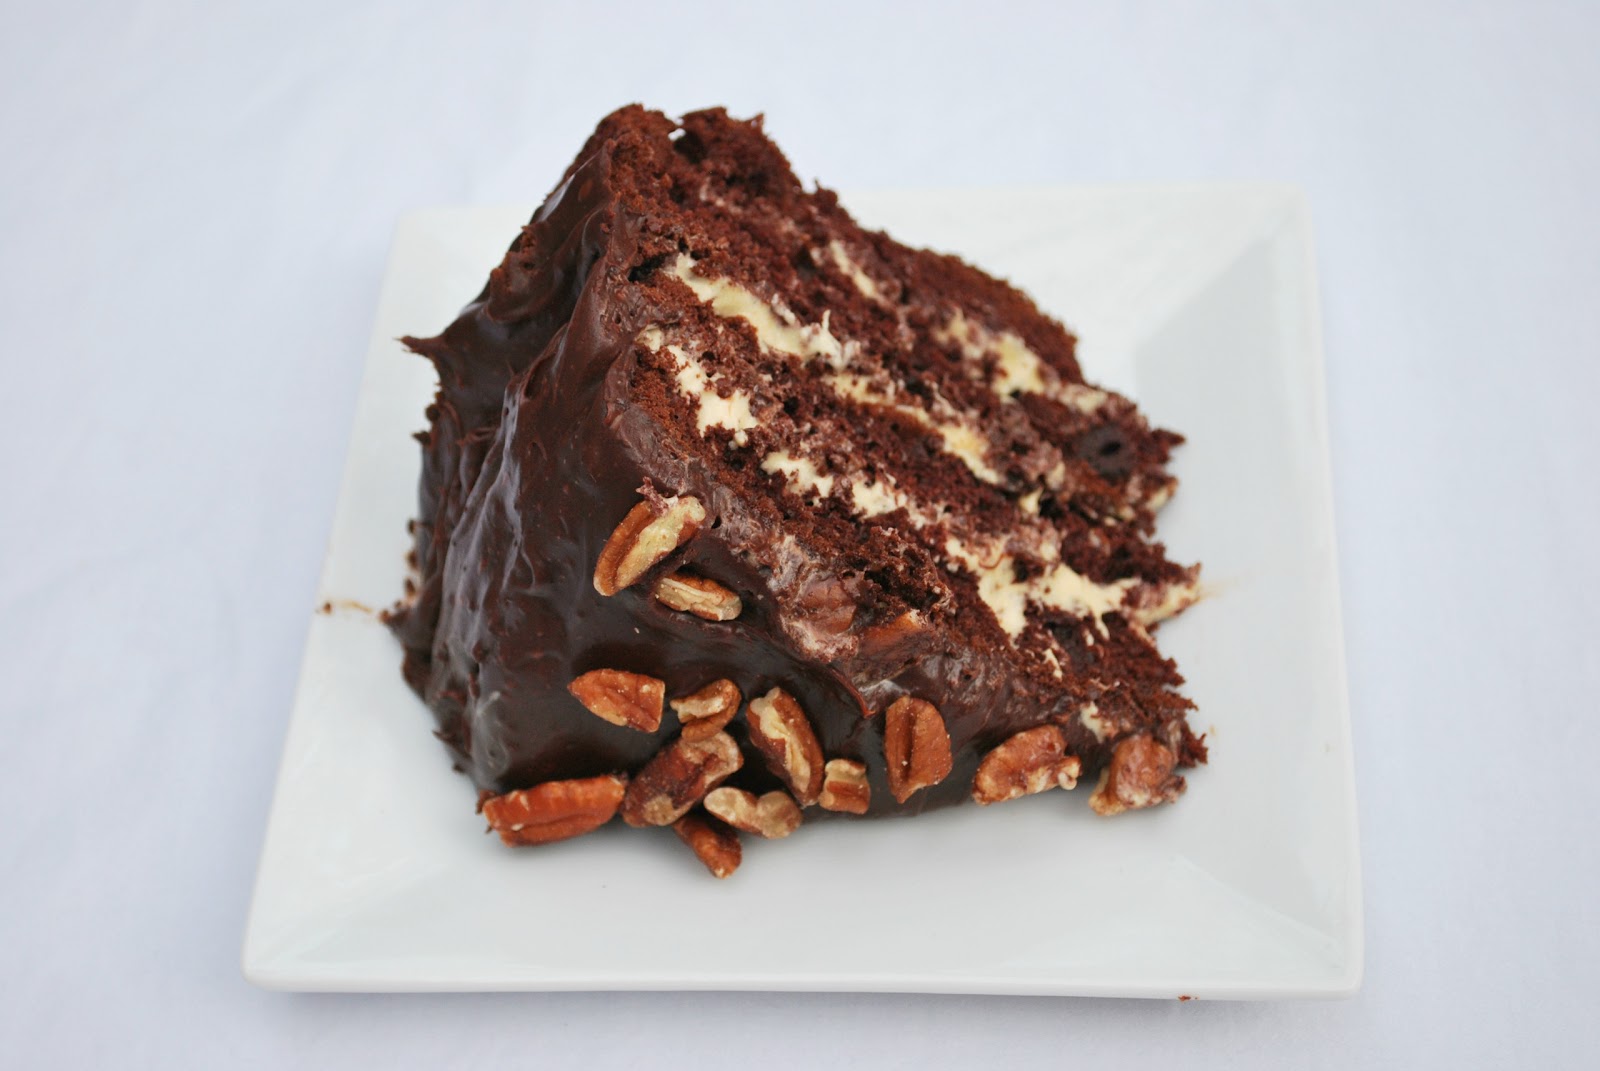
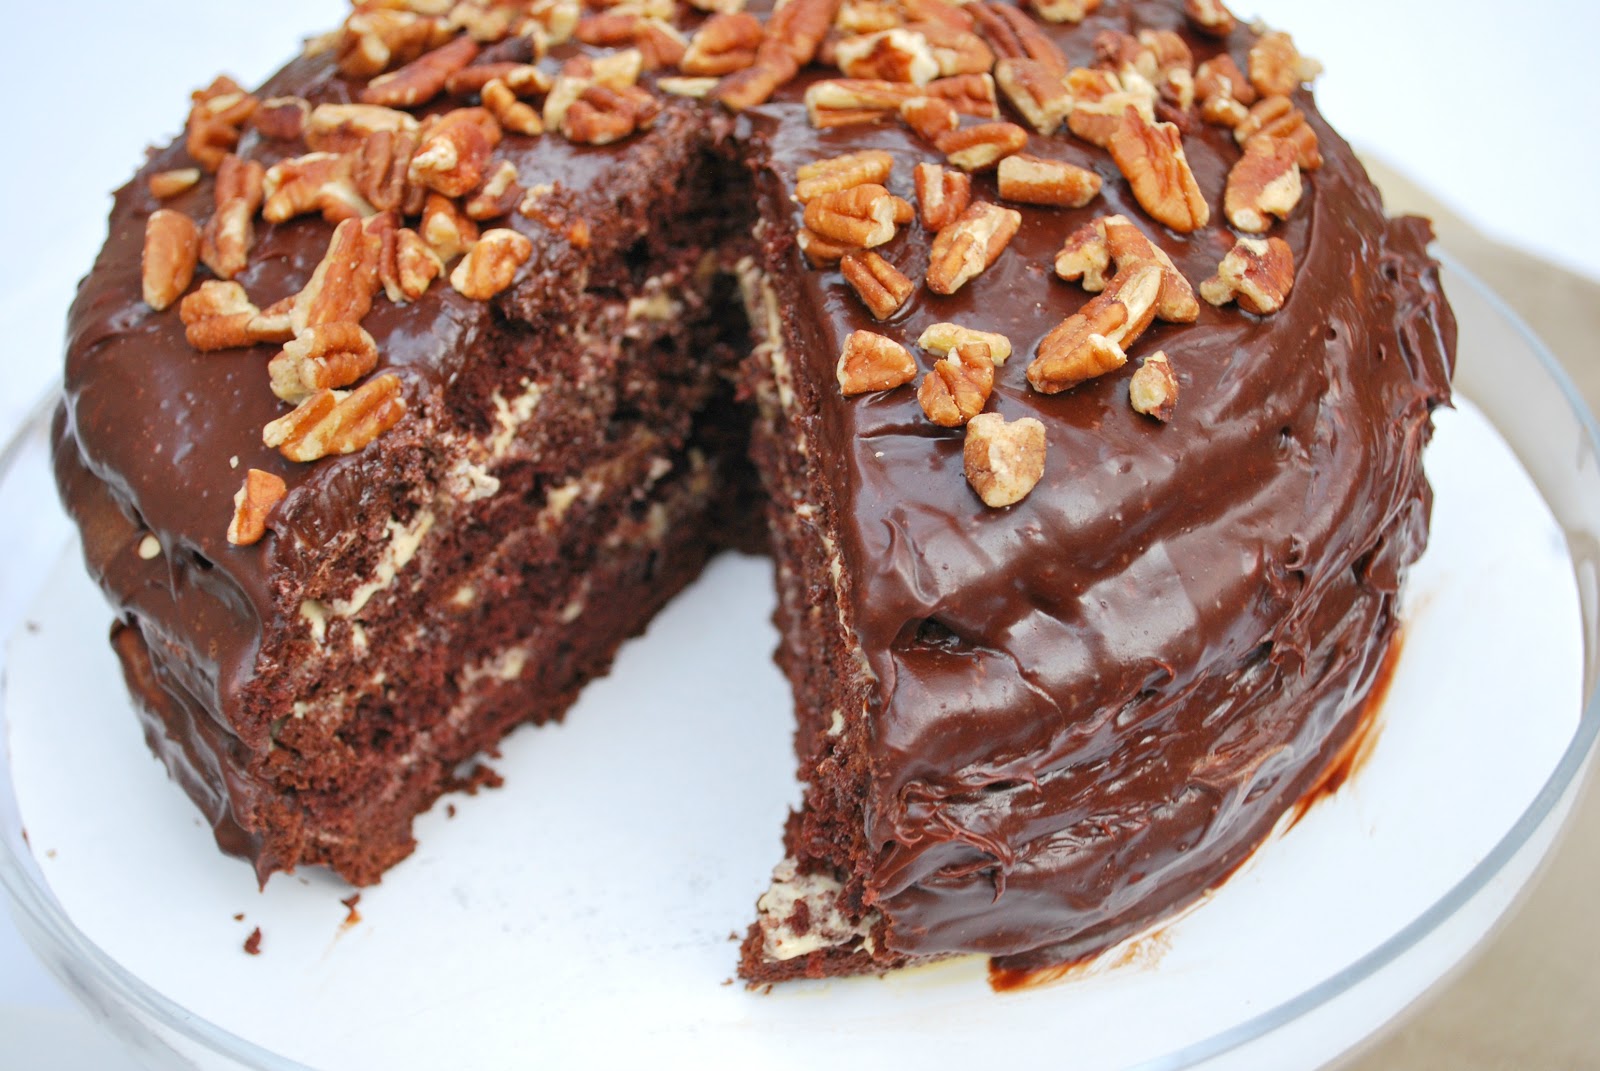
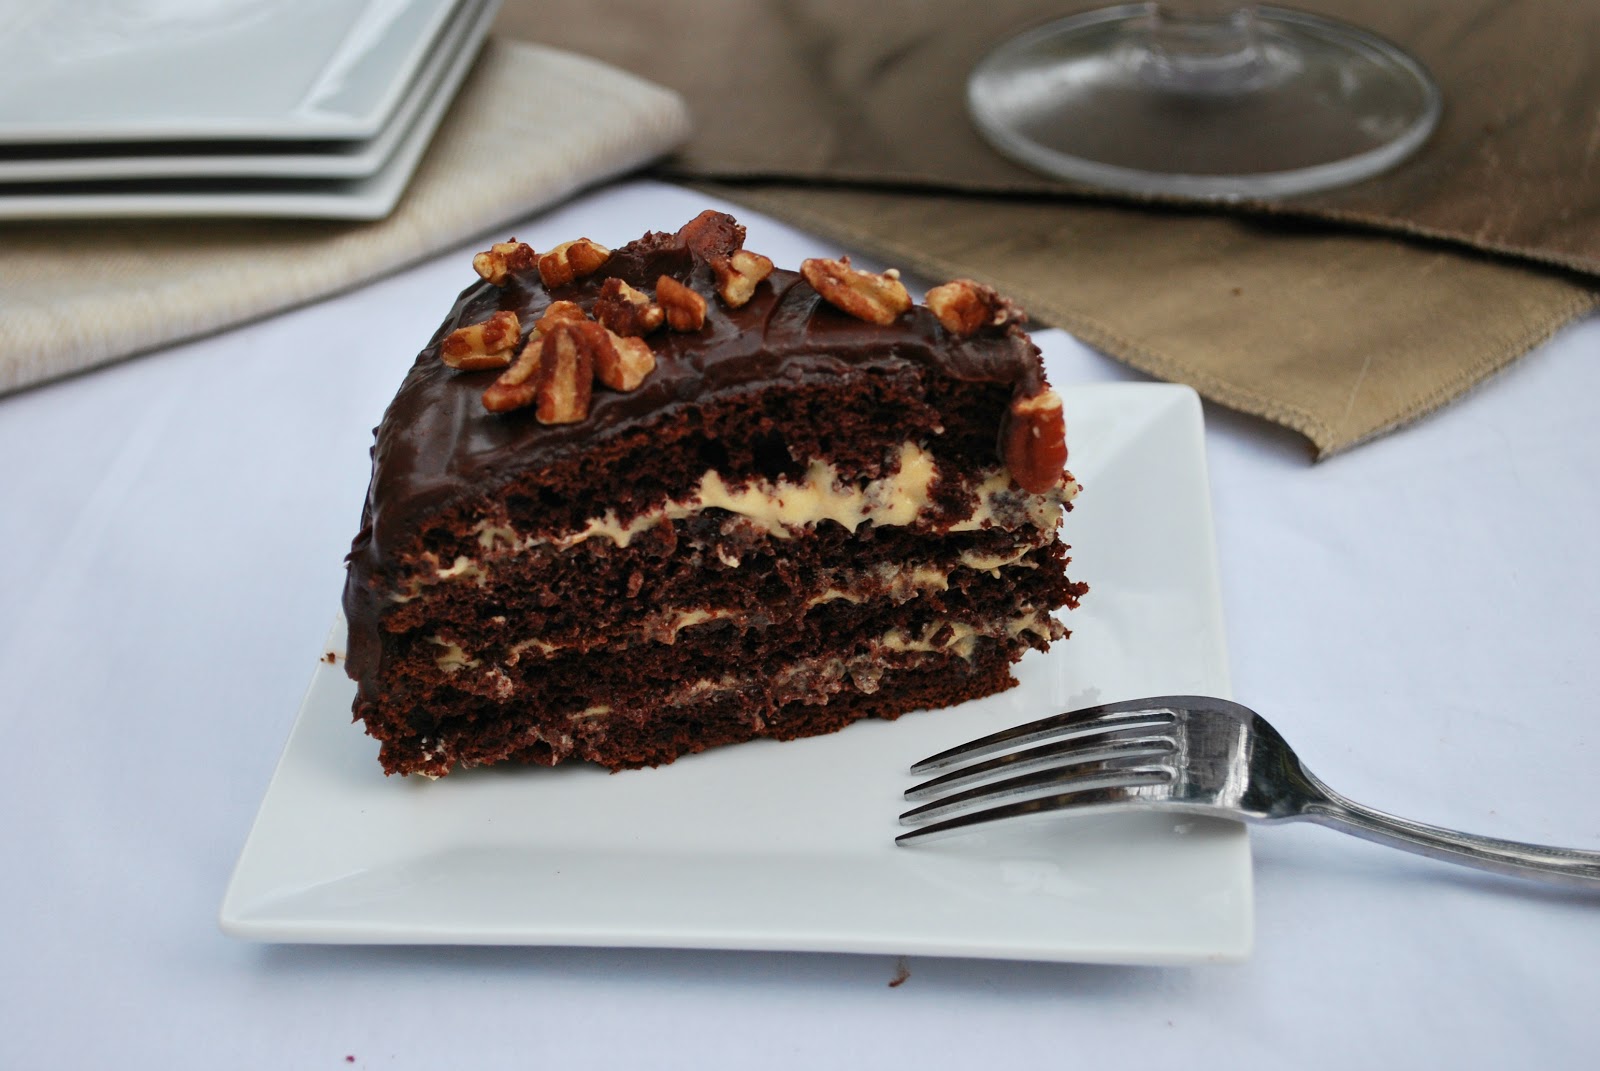
So the moral of the story is, make this cake!  I was extremely pleased with how it turned out.  This cake has 4 layers a soft, moist devil's food cake with a creamy, smooth caramel filling.  The entire cake is topped off with a final layer of melted dark chocolate and delicious pecans.  The secret that makes this cake work is you whip chocolate pudding mix into the cake batter before you bake, and vanilla pudding mix into the caramel filling.  Cool Whip is also added to melted dark chocolate to give it a creamy, dreamy texture.


This is not something I regularly make, but every once in-awhile it is always a good idea to bake a cake.  Just go to the gym first!


*The orginal recipe can be found here.  Check out this recipe featured on Kitchen Daily here!

Ingredients

1 package of devil's food cake mix (2-layer size, for 9" pans)
1 package (3.9oz) JELL-O Chocolate Instant Pudding
1 12oz jar caramel sauce
1/2 cup skim milk, divided
1 package (3.4oz) JELL-O Vanilla Flavor Instant Pudding
1 tub (8oz) COOL WHIP Whipped Topping, thawed, divided
10 oz dark chocolate chips
1/4 cup pecan pieces


Method

First you need two 9" round pans to make the cake layers.  Preheat your oven per the mix's instructions.  Combine cake mix with one package of chocolate pudding mix.  Then add your wet ingredients, mix and bake all per the instructions on the box.  Remove from oven and let cool in pans for at least 10 minutes.  Then remove the two cakes from the pan and let cool for another 10-15 minutes on a wire rack.

In the meantime while the cake is cooking, combine the caramel sauce and 1/4 cup milk in mixing bowl; stir.  Next add the dry vanilla pudding mix and whisk for about 2 minutes. Gently stir in 1-1/2 cups COOL WHIP which is about 1/2 of the tub. Refrigerate for 20 minutes or until chilled. 

Caramel sauce
After adding vanilla pudding mix and cool whip
With a long serrated knife, cut cakes horizontally in half.  Stack on plate, with spreading 1/3 of the caramel mixture between each layer.  


Lastly, melt the dark chocolate on the stove top over medium heat for 5-6 minutes or in the microwave on high for 2 minutes while stirring occasionally till the chocolate begins to melt. Add 1/4 cup of milk to the chocolate.  Add COOL WHIP to the chocolate and combine evenly.  


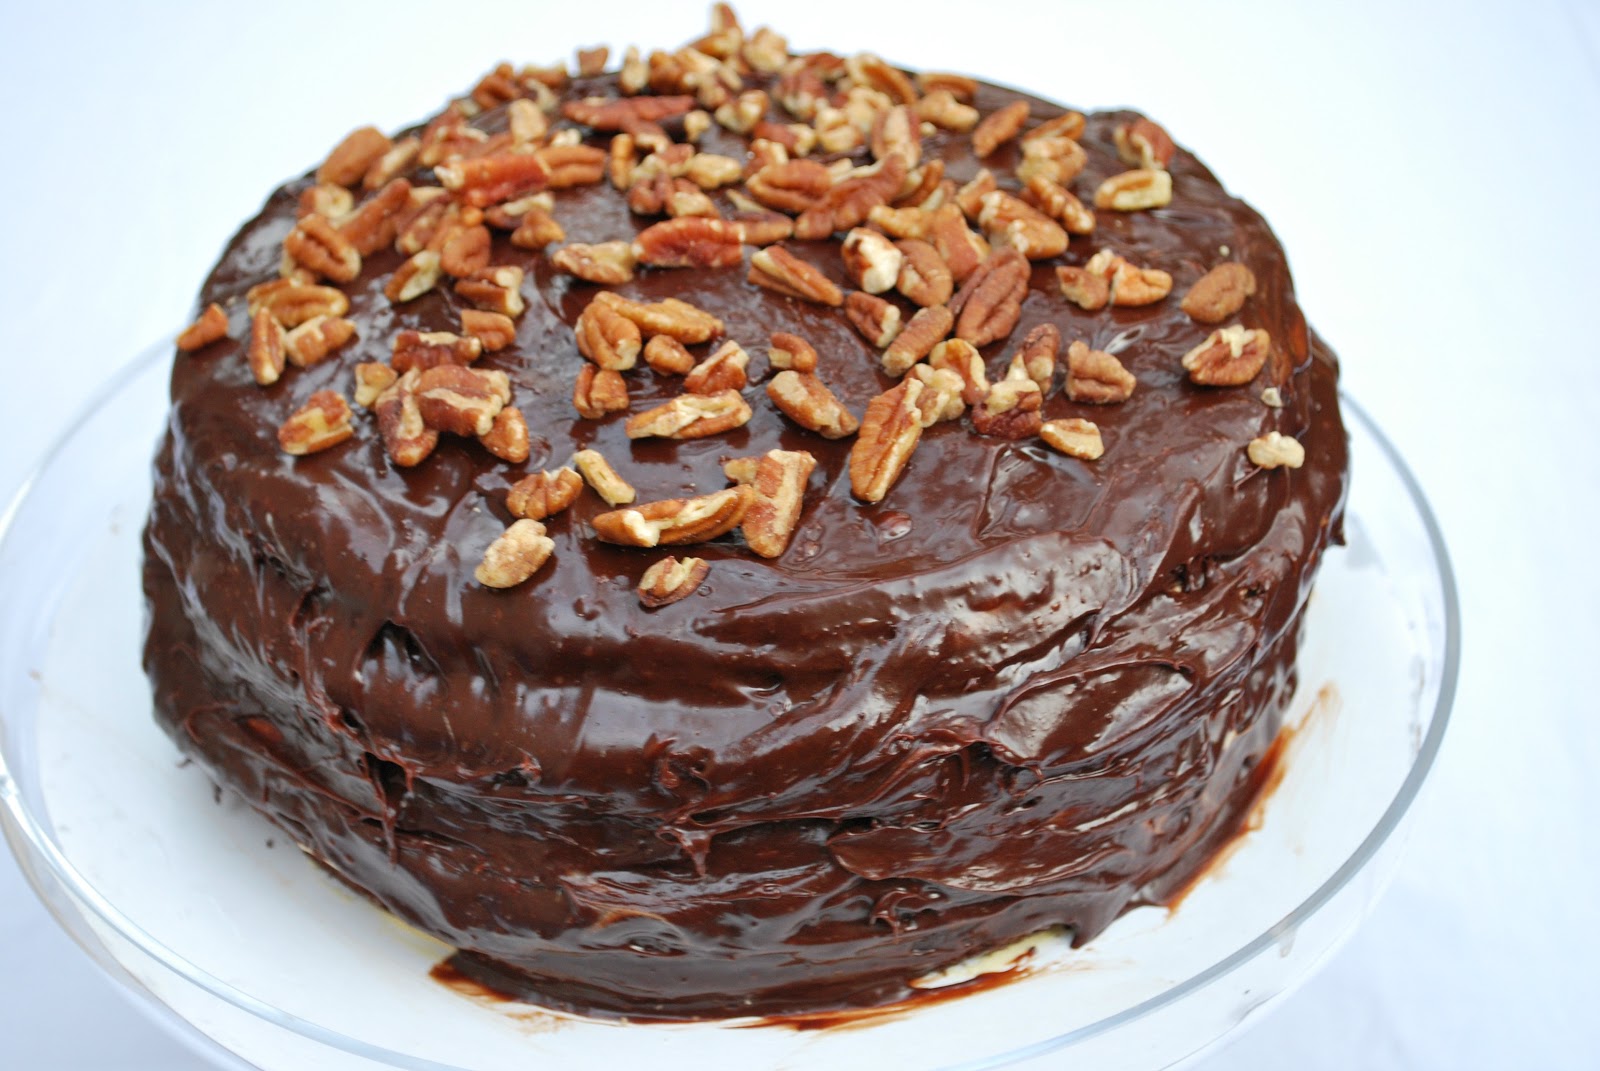
Carefully spread the chocolate onto the top of the cake and all around the side of the cake.  It's okay if it is a little messy, perfection is not the key to this cake!  Finish by arranging the pecan pieces on the top!  Enjoy!


I made this cake with Jello-O sponsored ingredients.

Sunday, November 11, 2012

Sauteed Oyster Mushrooms


Have you ever seen a product/item at the grocery store and are intrigued, but have no idea what you would do with it?   That was me for many years every time I spied oyster mushrooms.  I really wanted to throw them in the cart but always stopped due to fear, anxiety and intimidation.  Seriously.  But there is something extremely unique and interesting about their coral-like stems and their funny shaped tops.  So when I recently stumbled on them at the farmers market, I immediately grabbed them before I could talk myself out of it. 


Are these easy to cook?  What do you do with them?  What flavors go with these fascinating and oddly shaped mushrooms?  After some experimenting, I quickly learned, yes, they are really easy to cook.  All you need to do is de-stem and clean, and they cook rather quickly.  Secondly, I recommend you use them in a simple saute for your first recipe.  When in doubt, I always turn to the tried and true winning combination of flavors of butter, garlic, white wine and parsley.  It can make anything delicious... trust me.  These flavors did not let me down and really allowed the flavor of the oyster mushrooms to come out.


Oyster mushrooms are mild in taste, yet almost have a sweetness to them. This delicious saute is simple and makes for an impressive side dish.  If you are a fan of mushrooms and looking to try something different give these a shot!   Perfect for wow'ing a loved one if I might say so :)


Ingredients
*the photographs show a half portion

6 oz oyster mushrooms, cleaned and stems removed
2 tsp garlic, minced
4 tbsp unsalted butter
4-5 tsp parsley
4 tbsp white wine, dry, i.e. Chardonnay
1/4 tsp salt
freshly cracked pepper

  
Method

In a large saute pan heat butter over medium high heat until melted.  Reduce heat to medium and add oyster mushrooms.  Saute for 3-4 minutes.  Add garlic, white wine, parsley, salt and pepper.  Saute for another 2-3 minutes and then serve hot.  Enjoy!

Sunday, September 30, 2012

Cheddar Cheese and Almond Nut Balls


Have you ever bought one of those "cheese" balls from the grocery store to put out as an appetizer?  You know, the kind that has the yellow/orange processed cheese covered with some kind of suspicious waxy nuts.  If you've bought one before, don't worry I'm not judging, I used to buy them too.

It seems there are dozens of recipes for them, most calling for sour cream, butter and cream cheese.  I have wanted to make one of these for years but haven't been able to find a recipe I liked.  You see, I wanted my cheese ball to use "real" cheese.  So you have no idea how thrilled I was to find a recipe for a healthier version in the Food Matters Cookbook by Mark Bittman.  Finally a recipe that calls for real blocks of cheese!! 


So this week I am SO proud to host this recipe for The Food Matters Project.  As you know, this is an incredible project I am involved with where over 30 talented food bloggers create recipes inspired by The Food Matters Cookbook.  I love this cookbook - it is filled with clever ways to amp up the food you cook in a healthy way that still tastes great.  Think simple, unprocessed meals that are full of vibrant fruits, vegetables, whole grains and the occasional fish/chicken/beef dishes. Bittman's simple philosophy is one I am very passionate about: eat more plants and less animals.

In true Bittman style, this recipe is full of healthy good-for-ya nuts on the outside and inside.  It replaces the "terrifying quantities of processed cheese*" for freshly grated parmesan and extra sharp white cheddar {the orginal recipe called for gorgonzola cheese but I am a true white cheddar girl at heart}.  When you are using real cheese, you can actually use less of it and still have more flavor.  Love it.  This recipe also allows you to add in all sorts of different ingredients.  Try a blue cheese, goat cheese or a spicy habanero jack cheese!   Throw in some cranberries, use different nuts, dried fruit, spinach or other vegetables... so many possibilities.  To get inspired, check out what the other bloggers from the Food Matters Project did with this recipe here.  Enjoy!

  
Ingredients

2 cups of unsalted almonds
juice of 1/2 a lemon
1/4 tsp cayenne pepper
salt and black pepper
1/4 cup freshly grated parmesan cheese
3 ounces of freshly grated white cheddar, divided {I used Cabot's reserve aged white cheddar}
1/2 cup slivered almonds
1/2 cup water
scallions or parsley for garnish, optional

Method

In a food processor, add 2 cups of almonds and pulse until very finely chopped and almost paste-like.  Add the lemon juice, cayenne pepper, parmesan, 2 ounces of cheddar, a pinch of salt and pepper and 1/2 cup water.  Process until the mixture is creamy and spreadable.  {Add a tbsp or 2 more water if the mixture seems too thick}.  Refrigerate for about 1 hour so it firms up.

what almonds look like after processing
Next, shape the mixture into 2 large balls.  In a shallow dish, combine the remaining ounce of cheddar with 1/2 cup slivered almonds.  Roll each ball in the mixture, evenly coating the surface.  Serve with crackers, a whole wheat batard or crudités! Give this a shot next time you are entertaining! 


 *quoted directly from the Food Matters Cookbook, hilarious right?

Thursday, September 20, 2012

Kitchen Daily & a Contest


Guess what??  I have exciting news!  Cheese Please has teamed up with Kitchen Daily as part of their curator network.  That means in addition to all sorts of cooking tips, recipes and menu inspirations you'll also be able to find certain Cheese Please recipes along with other great content.  I am so thrilled to be able to be involved with such a great site.  Check it out!

I also have a great contest to share with you, my readers.  Kitchen Daily is offering you the opportunity to win groceries for an entire year with their What's on Your Menu contest.  So amazing!!  All you need to do is enter your best orginal breakfast, lunch or dinner recipe.  A winner will be chosen from each category.  Submissions and voting need to be completed by October 5th.  Good Luck!!!!!!!!  Let me know if you enter and I'll vote for you!!


Tuesday, September 18, 2012

Fresh Tomato Basil Bisque


I think pretty much everywhere in the country now tomatoes are bountiful.  The problem is, for most places, tomato season ends quick.  Once day the markets have ripe, luscious, bright red tomatoes and then all of a sudden, none.  That is when I realize summer is really over.   Not back to school, not a new month on the calendar, nor the celebration of Labor Day.  Just the absence of tomatoes!

So I highly urge you to stop what your doing and go out an buy some local tomatoes.  Now.  Because they will gone before we know it!  And one of the best ways to use those tomatoes is to make a fresh tomato basil soup. The best part of this soup is that it freezes really well.   You'll be able to enjoy the taste of ripe, luscious tomatoes for the months to come!


This version of tomato basil bisque is special because it is super healthy and very low calorie.  No heavy cream, butter or half and half are needed.  The base of the soup is simply fat-free chicken stock {I always go organic}. Fresh tomatoes, sweet vidalia onion, a tiny bit of garlic and roughly chopped fresh basil are added.  Top the bisque off with a bit of parmesan if you dare :)  Make this before the tomatoes disappear where you live!

  
Ingredients

3 large local tomatoes, diced
1 cup of vidalia onion, diced
1 tbsp garlic, minced
1 tbsp extra virgin olive oil
1 cup fresh basil, roughly chopped
32 oz chicken stock
1/2 tsp salt
pinch of red pepper
parmesan for topping

Method

In a large sauce pot heat 1 tbsp of extra virgin olive oil  and 1 tbsp of garlic over medium-low heat.  Brown the onions until the begin to become translucent (about 3-4 minutes).  Add the chicken stock, tomatoes, and basil.  Season with salt, pepper and red pepper.  Bring to a boil and then reduce heat to simmer for about 30 minutes.  Using an immersion blender, blend soup in the pot to a smooth texture.  (If you don't have an immersion blender, transfer soup to a blender one ladel at a time). 

Serve warm with parmesan cheese.  Make a double batch so you'll be sure to have leftovers and store them in ziploc bags in your freezer!


Tuesday, September 4, 2012

Whole Wheat Cous Cous Salad


I have been eating a boat-load of quinoa lately.  Ever go through stages like that?  I love, love, love it, but I decided that it was time to change things up and use something slightly different.... whole wheat cous cous!  I know, I'm getting wild!

Over the weekend we headed up north to stay at our friends lake house.  I love weekends at a lake, it is so fun to be out on the boat, the water is so refreshing and it feels so good to be out in the sun.  While we were out boating a friend and I were deep in conversation over quinoa.  {Obviously, what else would you talk about while boating?}  She told me about a recipe that she uses all the time and I had to try it.  This is my version, but with whole wheat cous cous.

Whole wheat cous cous is actually a very easy ingredient to use - it cooks in only 5 minutes.  The same as regular cous cous.  The only difference is the healthy whole grains.  Well, technically cous cous is actually a very tiny pasta, but it still works extremely well for a side dish or the base of a salad like this one!
 

For this salad I used heirloom cherry tomatoes from the farmers market.  Not only are they so pretty to look at and they taste almost sweet.  Crunchy english cucumbers are added with salty feta cheese.  A little bit of extra virgin olive oil, lemon juice and parsley tie the dish together.  Don't skip the parsely!! It definitely adds a lot to the dish.   I found the dish to taste the best cold, though I also think it works at room temperature.  Overall, this salad is perfect on it's own for lunch, or as a side dish at dinner.  Do you have a favorite whole grain dish?  I'd love to hear about it!

Ingredients

1 cup of uncooked whole wheat cous cous
1/2 of an english cucumber, peeled, sliced and quartered
1 cup of heirloom cherry tomatoes, cut in halves or quarters
3 tbsp of chopped parsley
1/2 cup feta cheese crumbles
2 tbsp extra virgin olive oil
juice from 1/2 a lemon
1/2 tsp salt
freshly ground black pepper, to taste


Method

In a medium sauce pot, combine 1 cup of whole wheat cous cous with 1 cup of water.  Bring to a boil, cover and remove from heat.  Let sit for 5 minutes then fluff with a fork.  If serving right away chill cous cous in the freezer, or let it come to room temperature.

In a large glass bowl, combine chilled cous cous, tomatoes, cucumbers, parsley and feta cheese.  Mix together.  Lastly, add olive oil, lemon juice, salt and pepper.  Give everything a final toss.  The great thing about this salad is it is still versitile - you can make this ahead of time, make a big batch for lunches, or eat right away!  Enjoy!

This recipe is also a contribution to the Food Matters Project!  This week, Sarah from Simply Whole Kitchen hosted Quinoa Tabbouleh.  Since I am on a quinoa overload, this is my take :)  Check out what other bloggers did here.

Sunday, August 19, 2012

Sparkling Peach Sangria with Strawberry Simple Syrup


Everything is better sparkling, right?  That's what I think, especially when it comes to sangria.  The other day I was thinking about how much fun this summer has been.  We've actually done a lot and I think hit all the "must-do" summer activities.  Go to the beach - check, go to the pool - check, relax and read a book - check, do something a little crazy - check, BBQ - big check :) But after mentally going through the past few months, I realized that something was missing.  Sangria!  I realized that I had not made this delicious and casual afternoon drink for at least a year! Time to change that.

Sangria takes your favorite wine (red, white, or sparkling in my case) to a new level with the addition of fresh summer fruit.  Amazing.  I tend to prefer white sangria over red...   I think it stems from my first date with Chris a lonnnnng time ago at Jaleo in Bethesda, MD.  Jaleo is an incredible tapas restaurant by the famed Chef José Andrés.  It was over a pitcher of Jaleo's famous white wine sangria that I really got to know my future husband.  So not only do I just generally like booze with fruit in it, it also has a special meaning :)


This sangria is something I put together after a trip home from the farmers market.  (Most recipes start out that way, right?) These beautiful white peaches were calling my name, so the peaches, strawberries, oranges and a few lemon slices were combined with my favorite - a bubbly Cava.  The secret ingredient to this sangria is a quick homemade strawberry simple syrup.  Sounds difficult, right?  It's not, I promise - all you need is strawberry, sugar and corn starch.  Throw all of those ingredients together in a small pot on the stove, and 10 minutes later you have your own simple syrup. It's so easy!  And the level of flavor and sweetness it adds to the sangria is a wow-factor.  Give this recipe a shot!


Ingredients
serves 4, to serve a larger group definitely double the recipe

1 bottle sparkling wine, Cava works best
2 large ripe white peaches, de-pitted and sliced
1 pint of strawberries, hulled and sliced
1/2 orange, peeled and segments sliced in half
2-3 slices of lemon
1/4 cup sugar
2 tbsp corn starch
1/2 cup water


Method

To make simple syrup - combine about 10 sliced strawberries in a saucepan with water, sugar and corn starch.  Heat on medium-high heat for about 5-6 minutes until the syrup starts to thicken.  You might have to make some adjustments - add more corn starch if it is not thickening, too thick add more water.  Once thickened, let cool to room temperature.  Use a strainer and strain strawberries from the rest of the syrup.

In a glass pitcher add the peaches, the rest of the strawberries, orange segments and lemon slices.  Next uncork the champagne (a "whooooo" is mandatory) and slowly add it to the pitcher.  If you add too much at once, you will overflow.  Lastly, add the strawberry simple syrup and ice.  Give it a good stir and serve to your lucky guests!   Enjoy the summer!!


Wednesday, August 15, 2012

Summertime Rolls with a Peanut Dipping Sauce


Are you in the mood for something fresh, exciting and flavorful?  If so, you are in luck :)  I made these summertime {historically spring} rolls last night and they turned out excellent!  Perfect dinner for the summer - you don't need the oven and you get to use all the fresh produce from the farmers market or garden! 

I majorly heart spring rolls.  They are definitely my favorite thing to order at any type of Asian restaurant.  When Chris and I were traveling all through SE Asia, I think I hit a world record number of spring rolls consumed by one person. It was relieving to bite into fresh, crunchy spring rolls after being out in the excessive heat of SE Asia.  I believe I had spring rolls with every meal!

Me being cheesy w/ my spring roll addiction.  Ho Chi Minh City, Vietnam

These summertime rolls are stuffed with a plethora of summer produce: crunchy iceberg lettuce, green onion, grated carrots, crisp cucumbers and sweet red peppers.  Then they are topped off with fragrant fresh basil and cilantro... which is a terrific combination of herbs for this type of dish.


Did I mention they also have shrimp?  This time I sauteed the shrimp in a thai chili sauce, which really ties all of the ingredients together.  The best part of the spring rolls, other than the explosion of freshness in your mouth, is a delicious peanut dipping sauce.  (The peanut sauce is so good that I actually used it to dip cucumbers and baby carrots in the next day, and I think it can be easily turned into a salad dressing).  This peanut sauce is sooo good and tastes great with these spring rolls.  My advice - double dip :)


Ingredients
makes 12 rolls

For the Summertime Rolls -

12 spring roll wrappers (plan on having a few extra in case a couple break)
1/2 of a head of iceberg lettuce, thinly sliced
1/2 of a sweet red pepper, thinly sliced
1/4 cup fresh basil, thinly sliced
1/4 cup fresh cilantro, thinly sliced
1/2 cup shredded carrots
1/2 of a cucumber, sliced thinly, larger slices cut in half
3 or 4 stalks of green onion
1/2 lb of small uncooked shrimp, peeled and deveined
1 tbsp peanut oil
2 tbsp of thai chili sauce


For the Peanut Dipping Sauce -

1/2 cup peanut butter
1/2 cup lite coconut milk
1 1/2 tbsp lime juice
1 tbsp brown sugar
1 tbsp soy sauce
1 tbsp minced garlic


Method

First make the peanut sauce.  I found the easiest way to do this is in a food processor.  (I will say this a hundred times, it is the most useful tool in the kitchen!) Process the peanut butter, coconut milk, lime juice, brown sugar, soy sauce and minced garlic for about 10 seconds.  Put peanut sauce in a container and refrigerate while making the rest of the rolls - it tastes great cold. 

In a skillet, heat the peanut oil until hot.  Add shrimp and then add the thai chili sauce.  Saute for 2-3 minutes until shrimp are pink.  Set aside.

To assemble the spring rolls I laid out all the prepared vegetables on a large cutting board.  I used a second cutting board for assembling the rolls.  The tricky part is the spring roll wrappers.  To get them soft, fill a round, medium-sized saute pan with 1/2" of water.  Place wrapper in water for only 10 seconds, not any longer.  The wrapper will seem stiff, but will soften as you work with it.

To finish the spring rolls, I topped the ingredients in this order, but feel free to do it your own way: Lettuce, basil, cilantro, green onion, shredded carrots, cucumber, red pepper and lastly shrimp.  Then simply fold them up like a burrito.  The secret is to not fill them too much and wrap them as tighly as possible.  It's okay if it takes you a few times to get the hang of it, my first few tries were pretty interesting :)  Serve with chilled peanut sauce and enjoy!

  
This recipe is inspired by The Food Matters Project which focuses on whole food recipes by Mark Bittman.  This week the Food Matters Project was hosted by Alyssa at Everyday Maven.  Check out what other inspiring bloggers did here.

Friday, July 27, 2012

Colossal Cookies: White and Dark Chocolate Chip


These cookies are huge.  Colossal in fact.  These gigantic gourmet cookies taste so incredible, they're amazing straight out of the oven, and even at midnight with a bowl of ice cream.  At least that's what I heard...... :)  I made these buttery, sugary, yeah-I-know-they're-not-good-for-me cookies last night.  I was having one of those days and by the time 9pm rolled by, I was overwhelmed with the desire to make some kind of cookie.  But I didn't want ordinary chocolate chip cookies, I wanted gigantic gourmet cookies.  Why do large thick gooey cookies always seem better???  I have no idea expect for the fact they just are!

The good thing about cravings for chocolate chip cookies is that most people almost always have all of the ingredients on hand.  The other good thing about chocolate chip cookies is that they only take 10 minutes to whip up, and 20 minutes to bake.  These cookies, though colossal, are no different.  The contrast of milky white chocolate and bittersweet dark chocolate chips in every cookie taste amazing.  Next time I might add in some nuts, but this time it was all about the chocolate! Next time you are at home and can't get chocolate chip cookies out of your mind, try these :)


This is one of the only recipes I'll tell you to not swap out whole wheat flour for all-purpose, reduce the butter, or find a way to "healthify" it.  Normally I'm all about eating more vegetables, less animals and the sort.  But sometimes we need to take a step back and remind ourselves - "Life's too short, just eat the cookie!!"  Greatest saying ever, thanks Mom :)

Ingredients
makes about 18 cookies, recipe adapted from AllRecipes.com

2 cups all-purpose flour
1/2 teaspoon baking soda
1/2 teaspoon salt
3/4 cup unsalted butter, melted
1 cup packed brown sugar
1/2 cup white sugar
1 tablespoon vanilla extract
1 egg
1 egg yolk
1 cup white chocolate chips
1 cup dark chocolate chips

 Method

Preheat the oven to 325 degrees and line a cookie sheet with parchment paper. (Makes for a very easy clean up!)  In a small bowl combine the flour, baking soda and salt.  

With a mixer (stand or hand held) mix together the melted butter, brown sugar, white sugar untill well blended.  Next add in the vanilla, egg, and egg yolk and beat till light and creamy.  Carefully mix in bowl of flour, baking soda and salt until just blended.  Stir in the chocolate chips by hand using a wooden spoon. Drop cookie dough 1/4 cup at a time onto the prepared cookie sheets. Cookies should be about 3 inches apart. 

Bake for 18-20 minutes untill the edges are lightly toasted.  Depending on  the type of pan, the cookies may take an additional 4-5 minutes (I also like mine slightly under-done).  Cool on a baking sheet for a few minutes and then transfer them to a wire cooling rack to cool completely.  Serve immediately or at midnight with a bowl of ice cream!!